| Having problems with your
shifter? The nice thing about the A1 shifter system, compared to the newer
cable type systems, is it's simplicity. Roll under your car and you will
find the bottom of your shifter attached to a steel rod, attached to a
black plastic ball that translates your movements into left and right and
forward and back movements through two other arms that are attached by
two plastic linkages to the shifter arm on the tranny. maintenance is minimal
and adjustment is simple.
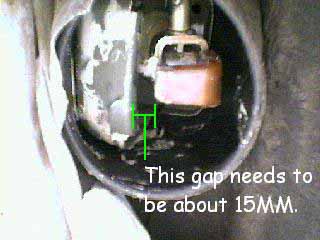
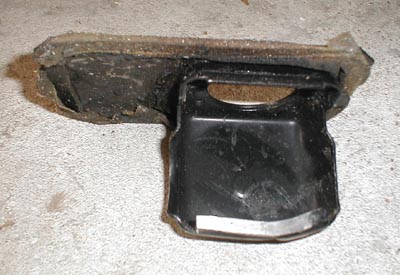
First, you would want to check for play or signs of wear. ANY signs of play or wear warrants the purchase of a shifter bushing kit. Even at the dealer, these kits run $6. I feel that, there is no excuse not to buy this kit and replace every bushing on the system. The other place to look for distortion of the plastic ended "dumbbell" linkages that are the go betweens of the different shift rods. I've seen where the steel center of the linkages are slightly bent or the plastic ends are oblong and cause unnecessary play. Replace these accordingly. You may find that these linkages can be effectively replaced with junkyard units. If all is good as far as play or wear goes, and you continue to have problems shifting, let's consider the following: Problems with shifting can ABSOLUTELY be sourced to the transmission itself. Grab the shift arm that is directly attached to the tranny and go through the gears. The shifting motion should be just as smooth and predictable as you would expect it to be at the shift lever. If you find that third gear is where first should be or that reverse is where first should be, then you have an issue with adjustment. Fortunately, adjustment of this kind is easy. Keep in mind that the gate for reverse (the piece that makes you push down to engage reverse) is in the shifter unit. It's a black piece of metal that you can see by removing the cover at the bottom of the shifter. The cover comes right off without special tools. Once removed the exposed underside will look like this:
The piece to the left in this
shot is the lock out gate for reverse. The brown piece of plastic you see
(referred to as the 'stop finger' in the Bentley Manual *) is what prevents
the shifter from nonchalantly going into reverse. If you push the shifter
all the way to the left, the plastic hits against the metal gate and stops
the shifter from moving any farther left. You can then proceed to move
the shifter forward, thus engaging first gear. When you push down on the
shifter, you allow the brown plastic piece to clear the metal gate, thus
allowing access to reverse (thus the exposed black metal on the piece in
this picture from where the plastic piece has scraped away all of the white
lithium grease). When properly adjusted, the shifter at rest should allow
15MM between the plastic piece you see above and the metal gate. You can
see that in this picture, this car's shifter is out of adjustment because
the clearance between these two parts seems to be only 10MM or less. What
happens in this scenario is that first gear is nearly inaccessible because
the plastic piece prematurely hits the metal gate preventing the shifter
from moving completely to the left. If this gap was greater than 15MM,
you would find reverse to be very difficult to engage, or the shifter would
easily pop out of reverse because the plastic piece would not stay under
the metal gate. There is no adjustment directly under the shifter, but
you can see the solid rod leading off the top of the photo. Follow this
rod to the down pipe of the exhaust manifold. Adjusting this gap is as
easy as twisting the rod one way or another to create the correct amount
of gap.
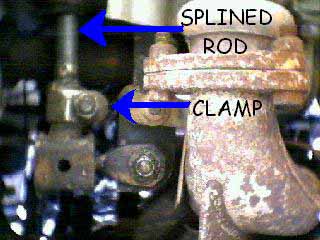
Undo the clamp (arrow points to the clamp I'm talking about) and pull the rod out. You need to pull the rod out because the rod is splined. Pull it out slowly so you do not end up moving the rod TOO MUCH. Pull the rod out, turn it in the direction you need to be going in (one or two notches), reinsert and clamp it back down. Wiggle the whole linkage system (to make sure the shifter is "at rest" at neutral). Go back to your shifter and check the gap between the brown plastic piece (which as of yet has a better name) and the metal plate. Repeat as necessary. I would also like to bring up a point that was made on the H20 VW Newsgroup about converting a 4 speed bunny to a 5 speed bunny. All of the books on the market will tell you the same thing about grabbing all of the linkages and the driver's side motor mount off of a 5 speed donor car and give you the step by step procedure on installing it, however, there is no mention that the metal stop plate, called the "shift plate", under the shifter on 5 speed cars is narrower to allow more side to side travel and that it should be replaced as well for better performance. I, for one, have done the 5
speed conversion without replacing the plate because, but your neutral
will be off center if you don't replace the plate and the splined rod adjustment
described above needs to be DEAD ON to get all five of your gears properly,
so keep this in mind when you're crawling under the car! Go ahead
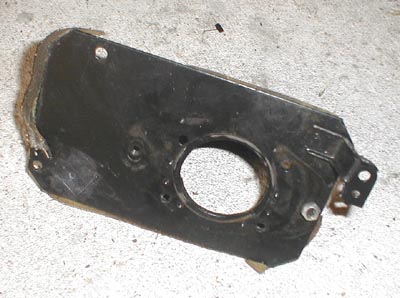
and grab the shift gate.
*-thanks to "BFDeihl" for
pointing out that the Bentley manual calls the 'brown plastic thingy' a
'stop finger'....
|